IY5606 VPN client for Mac users

If your client VPN ( OpenVPN) does not work on your MAC, you can install the 30 days trial version of Viscosity.

https://www.sparklabs.com/viscosity/download/

After the installation, you can use our OpenVPN configuration file to activate the VPN
( https://cim.rhul.ac.uk/files/2020/10/RHUL-ISG-SecTest.ovpn )

https://www.sparklabs.com/support/kb/article/getting-started-with-viscosity-mac/#installing-running-viscosity

It is available for older versions of the OS as well.

OS X 10.9Viscosity 1.7.11
OS X 10.10Viscosity 1.7.14
OS X 10.11Viscosity 1.8.4
macOS 10.12Viscosity 1.8.6


MacOS — How to — 1st setup

Every MacBook or iMac bought by RHUL and delivered directly to the end-user needs to install the following software:

In addition, based on Department requirements, each user can install:

No-machine enterprise client

Mathlab

Matematica

* If the macOS has been updated to Catalina or Mojave 10.15 there is a special workaround for the VPN

Microsoft Office 365:

Open your internet browser and login in the RHUL email:
http://mail.rhul.ac.uk/
Click on the icon on the top left corner ( App Launcher )
and click on the Office 365 –>  link
Then you can follow the instruction after clicking on the Install Office button.
Use your RHUL email to get the license for it.


CIM VPN ( macOS up to  10.14)

Log in at our VPN portal:
My CIM
Download the Cisco Anyconnect client
The address to connect to is:
my.cim.rhul.ac.uk

Username and password as your RHUL account

Workaround for MacOs After 10.14

Install brew ( brew.sh/ )
past this command in macOS terminal

/usr/bin/ruby -e "$(curl -fsSL raw.githubusercontent.com/Homebrew/install/master/install)"

then

brew update
brew install openconnect

When the installation is complete you can run this in a terminal window

sudo openconnect my.cim.rhul.ac.uk

If you want a GUI for the openconnect, it is available here
openconnect.github.io/openconnect-gui/  but since the developer has not registered with Apple the first time the software starts it immediately stops.
You have to go into Security and privacy options and confirm to open the application anyway. Then open the application again make a new profile for our VPN with the address my.cim.rhul.ac.uk and your RHUL username

CIM TEAM

SGX-Server KVM-QEMU

Special configuration for SGX server and virtualization environment

The system build is based on the suggested guide available here:

SGX VIRT

(VM creation)

The system allows creating VM using virt-manager

The XML file that defines the basic VM has to be edited

The following example shows the commands and values of the file.

VM creation: uuidgen
qemu-img create -f qcow2 testvm.qcow2 20G

edit the XML (testvm.xml)[edit]

<-- <domain type='kvm'>
--> <domain type='kvm' xmlns:qemu='http://libvirt.org/schemas/domain/qemu/1.0'>
<-- <emulator>/usr/local/bin/qemu</emulator>
--> <emulator>/usr/local/bin/qemu-system-x86_64</emulator>

virsh define testvm.xml

<qemu:commandline>
<qemu:arg value='-cpu'/>
<qemu:arg value='host,+sgx,+sgxlc'/>
<qemu:arg value='-object'/>
<qemu:arg value='memory-backend-epc,id=mem1,size=16M,prealloc'/>
<qemu:arg value='-sgx-epc'/>
<qemu:arg value='id=epc1,memdev=mem1'/>
</qemu:commandline>

The value memory-backend-epc id=mem1 size=16M prealloc
sets up the EPC: you can change the value taking into account how many VMs the system needs to run.

To let the students access the VM directly via ssh, please edit the network section and choose the macvtap with bridge and e1000 driver
This will make the VMs reachable on 203 subnet and then set up a static IP for the server.

Version 0.1.1

Warning for updating to MacOS Catalina

For all MacOS users willing to update to the new OS Catalina, CIM team do NOT support the OS yet.

We suggest to put the update on hold until further notice.

You can test your system for the update following this short guide and open a ticket on our help desk with the list of your legacy software that won’t work on Catalina.

1) First, click on the Apple logo in the upper-left corner of your screen and select “About This Mac.” Click on “System Report,” and scroll down the sidebar a bit until you see “Legacy Software.” Any apps in this section are 32-bit apps and won’t work on macOS Catalina.

2) If you don’t see any apps at all, try clicking on “Applications” in the sidebar. There should be a column that says “64-Bit (Intel),” and any apps listed with “no” are 32-bit, not 64-bit.

3) Reverting to Mojave is a destructive process and involves erasing the hard disk. Making a time machine back up is mandatory before reinstalling Mojave.

If you need help for the reinstallation process, open a ticket in our help desk.

CIM Team


MacBook Pro Retina with Touch Bar 13-inch

MacBook Pro Retina with Touch Bar 13-inch has become the standard laptop within the Computer Science, ISG and Mathematics.
Specifications

  • 1.4GHz quad-core 8th-gen i5
  • Turbo Boost up to 3.9GHz
  • 8GB 2133MHz LPDDR3 memory
  • 256GB PCIe-based flash storage1
  • Intel Iris Plus Graphics 645
    • Dual display and video mirroring: simultaneously supports full native resolution on the built-in display and up to 3840×2160 pixels on up to two external displays, both at millions of colours.
  • 13.3″ LED backlight 2560 x 1600 / WQXGA
  • 720p FaceTime HD camera
  • Built-in 74.9-watt-hour lithium-polymer battery
    • Up to 10 hours wireless web
    • Up to 10 hours iTunes film playback
    • Up to 30 days of standby time
  • Force Touch trackpad
  • WiFi
    • GigE, 802.11b, 802.11a, 802.11g, 802.11n, 802.11ac
  • Bluetooth
    • Bluetooth 5.0 wireless technology
  • macOS 10.14 Mojave
    4-Year Warranty

    • 1 Year Apple Care
    • 3 Years via supplier

For more information, please visit the Apple Macbook Pro page.

Dimensions

  • Height
    1.49 cm (0.59 inches)
  • Width
    30.41 cm (11.97 inches)
  • Depth
    21.24 cm (8.36 inches)
  • Weight
    1.37 kg (3.02 pounds)


Ports

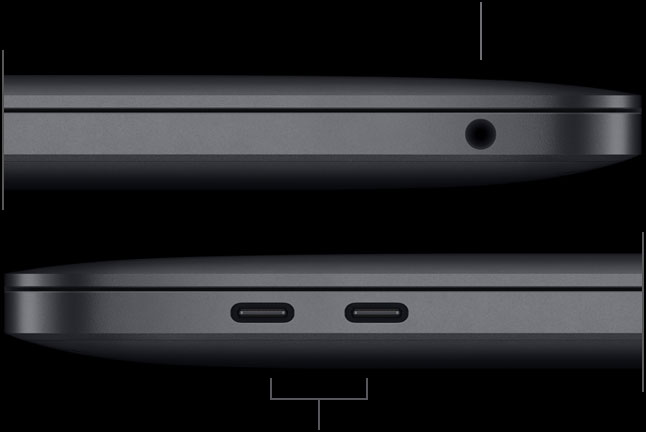
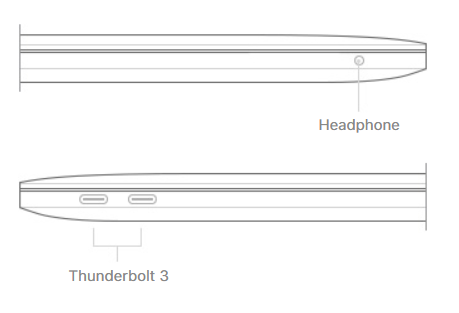
ports_hero

Left Side

  • 3.5mm jack

Right Side

  • 2x USB-C Thunderbolt 3

In the Box

  • MacBook Pro with Retina display
  • 61W USB‑C Power Adapter
  • USB‑C Charge Cable (2m)

Notes

Once purchased, the specifications of the Macbook Pro Retina 13-inch cannot be upgraded (with the exception of the storage). Memory, CPU, GPU are all integrated into a single board.

MPXU2B/A-4YR

Dell Latitude 7400

Welcome to a smarter design

Specifications

  • Intel Core i5-8365U  Processor Base, Integrated UHD Graphics 620 with Intel® Core™  i5-8365U  Processor (Quad Core, 6M Cache, 1.6GHz,15W)
  • 14.0″ FHD (1920 x 1080) AG, Non-Touch, SLP, 6.0mm Cam/Mic, WLAN/WWAN Capable, Carbon Fiber
  • Single Point Keyboard UK-English with backlight
  • Touch FPR in Power Button, FIPS 201 Contacted SC Reader, Carbon Fiber
  • 8GB, 1x8GB, DDR4 Memory
  • 512G PCIe NVMe Class 40 Solid State Drive
  • UK Power Cord
  • 4 Cell 60Whr ExpressCharge Capable Battery
  • 65W AC Adapter, 7.4mm Barrel
  • Intel® Dual Band Wireless AC 9560 (802.11ac) 2×2 + Bluetooth 5.0
  • Internal UK/Irish Qwerty Backlit Keyboard

Operating System Support

Available with Windows 10 Pro 1803 or Linux

Ports & Slots

Ports and Slots

1.Universal Audio Jack | 2. External uSIM card tray (optional) | 3. uSD 4.0 Memory Card Reader | 4. USB 3.1 Gen 1 with Powershare | 5. Noble Wedge Lock Slot | 6. Power adapter port | 7. Thunderbolt™ 3 with Power Delivery and DisplayPort | 8. HDMI 1.4 | 9. USB 3.1 Gen 1 | 10. SmartCard Reader (optional)

Dimensions & Weight

1. Height: Front 17.82mm (0.70″) – Back 18.96mm (0.75″) | 2. Width: 321.35mm (12.65″) | 3. Depth: 214.08mm (8.42″) | Starting Weight: 1.36kg (2.99lb)*

Tesla GPU server

Machine learning and neural network course resources.

Postgraduate students can log in our Tesla GPU server in order to run Tensorflow or Pytorch code via jupyter notebook

Log in using Campus credential (User Ex.: AEOU001)

Jupyterhub Tesla GPU

( Help requests can be submitted to our helpdesk  CIM helpdesk  )

After the login the system will show a dropdown menu with two options:

  • Tensorflow version: 2.6.2
  • PyTorch version: 1.11

Choose your preferred environment and SPAWN the container.

Containers can be stopped using the Control Panel button (top right)

Notebook content will persist after a stop/restart.

Each container has 2 Cores and 4 Gb of RAM with 25 Gb of storage.

GPU RAM has not a hardcoded limitation and needs a precise setup before running code against a large dataset, but as rule of thumbs 3 Gb of VRAM are always available.

Continue reading

Electronic Submission of Coursework

If you have been asked to submit coursework electronically other than through Moodle then you need to use the submitCoursework command on the Linux.cim.rhul.ac.uk terminal server. If you did your work on a laptop or other computer of your own, you will first need to copy the files to the departmental system, e.g. using WinSCP.

There are two ways to use the command. The first way is very simple:

$ submitCoursework cs1701ex1

In this example you are submitting coursework for the (imaginary) CS1701 course which you have saved in the directory cs1701ex1. The script will prompt you to enter the course and exercise names, and will then tell you whether or not your submission was successful.

The second more advanced form of the command is:

$ submitCoursework -c CS1701 -e ex1 cs1701ex1

Using this form allows you to specify the course name, exercise name and directory all in one go and will save you a little typing.

If you do not know the course name or exercise name then check the materials given to you or ask the course lecturer.

Carefully read the messages displayed on the screen: they will clearly state whether the submission has succeeded or failed. If it succeeds you will see a list of files that have been zipped up and copied, and you will also receive an email receipt. You are advised to keep the receipt as proof of submission.

Issues relating to coursework submission should be reported to the CIM helpdesk.